Wednesday, September 30, 2009

Apple Crisp


I probably make apple crisp more often than apple pie simply because it's easier. If you have my first book of essays, "Appreciating the Simple," I've written on the "art" of apple-pie making. If not, I'll summarize here: Please, use a variety of apples for the best taste, always including one or two Red/Gold Delicious (the exception, I think, are Honey Crisps). Lemon juice brings out the taste of the apples; you don't need much. A bit of allspice added to cinnamon makes the best apples. If the apples are tart, use more sugar; if sweet, use less. Keep your apples stored in a cool place or they will begin to go soft and grainy. Bring to room temperature before slicing.

(FYI: Here in the states, we make the crisp using raw apples. In England and most of Europe, they begin with a quick sauté  in a shallow pan to soften them up. Something to think about, since it allows you the choice to add seasonings to taste as you go.)

I like this recipe because the topping uses melted butter as opposed to the more familiar whole butter one must work into the ingredients. It produces a "crisp" crisp with a bit of crunch even the next day (if it lasts that long). The combination of baking powder and soda causes the "crisp" to rise a bit and brown.

To be truthful, I always use apple-pie spice. I think it is the tastiest. And it's what my would have used ...

8-10 cups all-purpose apples, peeled, cored and sliced*
1/2 cup white sugar
1 tablespoon all-purpose flour
1 teaspoon ground cinnamon
1/4 teaspoon allspice
1/2 teaspoon vanilla
1-3 teaspoons fresh lemon juice
1-2 tablespoons water

Topping
1 cup "old fashioned" oats
1 cup all-purpose flour
1 cup packed light brown sugar
1/4 teaspoon baking powder
1/4 teaspoon baking soda
1/2 teaspoon cinnamon
1/8 teaspoon allspice
1/2 cup butter, melted

*There's really no need to "core" apples unless you are planning to stuff them. Simply peel and begin slicing around and as near the core as possible. Slice into desired thicknesses. If the apples are crisp, make your slices thinner; if the apples are soft, make the slices thicker otherwise they will bake into applesauce.

Place sliced apples into a large bowl. Sprinkle with the lemon juice and vanilla. Toss. Mix the flour, white sugar and spices together. Mix into apples and toss until well coated.

Spray or butter a 9 x 13 glass baking dish. Evenly spread out the apples. Sprinkle with the water. (Here's what I do: run your hand under cold water and shake/sprinkle it over the apples. Do this several times. Works like a charm.) You don't want a lot of water, just enough to make a nice "syrup" when they bake.

Mix the topping ingredients until crumbly. Evenly spread over the apples. Bake for about 45 minutes in a 350-degree oven. Check the center to see if the apples are done. If not, cover with foil and return to oven for about 10 more minutes. Serve warm.

This recipe is easily halved. Place in an 8 x 8 pan or dish. Make sure you use Quaker Oats that reads "old fashioned" on the front. I've used the quick oats but you won't get as crisp a crust.

Tuesday, September 8, 2009

Crescent Roll Cheese Cake Squares (Easy Mexican Sopapilla)


Served warm from the oven or chilled from the fridge, these easy-to-prepare cheese squares
are destined to hit the bull's-eye-of-approval from family and friend.

I wasn't really sure what to call this. Or how to categorize it. I used to make a similar recipe years ago that was simply dusted with powdered sugar. I prepared this one for the usual Sunday morning "surprise." Served warm it's wonderful. Refrigerated, it's even better. The recipe is easily halved. It's now possible to buy crescent rolls in a single sheet instead of being perforated to separate into rolls.

The cream cheese is absorbed into the flaky pastry leaving a wonderful custard-like middle. The sugar topping provides just the right amount of "crunch."

FILLING
  • 1, 8-ounce pacakage softened cream cheese
  • 1 cup white sugar
  • 1 teaspoon vanilla extract
  • 2, 8 ounce packages refrigerated crescent rolls
TOPPING
  • 1/2 cup melted butter (you won't use it all)
  • 1/2 cup white sugar
  • 1 teaspoon ground cinnamon

Preheat oven to 350 and spray a 9 x 13 baking pan.

Beat the cream cheese with the sugar and vanilla until smooth.

Unroll one package of crescent rolls and roll to fit into the pan. If using the non-perforated kind, it is already shaped to fit. Spread the cream cheese mixture evenly over the layer and top with the remaining sheet of dough.

Stir together the sugar and cinnamon.

Liberally brush the top layer with the melted butter. When you think it's too much, brush with more. Evenly sprinkle the sugar/cinnamon mixture over the top.

Bake for 30 minutes until the dough has puffed and the corners are golden brown and sugar has absorbed the butter and is a solid crisp layer. Cool at least 20 minutes before slicing. Store leftovers in refrigerator.

Saturday, September 5, 2009

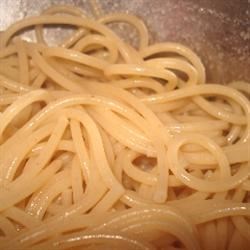
Pasta with Garlic, Olive Oil and Parmesan

Reheating Pasta

When we think pasta, we tend to think of sauces. That's too bad, because pasta on its own is a simple delight and a great side for most meals. And it's pretty inexpensive, too. Add some diced, grilled chicken or shrimp, and you have an instant meal.

Pasta ABSORBS a lot of liquid. That's just what you want. And it requires a lot of salt. I find that 2-3 garlic cloves work best. Use less or more if that's your taste--but not much more.

If you have access to Italian-made pastas, by all means use them for this recipe. Italian pastas, available in many shapes and sizes, have a better taste and "bite" than American-made counter parts.

  • 1 box pasta, such as angel hair, spaghetti, vermicelli, linguine
  • 2-3 garlic cloves, peeled
  • 1/2- 3/4 cup light olive oil
  • 2 tablespoons unsalted butter
  • 2 cups finely shredded Parmesan cheese
  • 1 tablespoon sea salt or other "non-table" salt
  • Freshly-ground black pepper
  • Fresh-grated lemon zest (optional)
  • Fresh basil leaves (optional)

Bring a large pot of salted water to a boil.

Meanwhile . . . get out the largest non-plastic, non-metal bowl you have, preferably with a flat bottom. Into it, "zest" your peeled garlic using a fine micro plane or a garlic press. (I highly recommend the micro plane). Lacking both, finely mince your garlic. Sprinkle with table salt and using the back of a large, flat knife, press back and forth until a paste forms. Lacking that initiative, mash the garlic in a mortar and pestle. Lacking that . . . well, you shouldn't be cooking.


A micro plane. No kitchen should be without one!

Place the garlic in the bottom of your bowl. Add the olive oil. Add the tablespoon of salt and about 20 grinds of fresh, black pepper. Stir. Dot with the butter and set aside. If using, add several grates of lemon zest.

Meanwhile . . . Using your trusty micro plane, zest about 2 cups from a wedge of Parmesan. The micro plane will make it nice and fluffy so it melts instantly into the hot pasta.

Add 1 box of pasta to the boiling water. Bring back to a boil and cook according to package directions. If using angel hair pasta, do not walk away from the pot! Angel hair pasta cooks within minutes and you don't want a clumpy mess.

When pasta is done, turn off the heat. Do not drain your pasta! Using a pasta ladle, remove the pasta from the water and add to the bowl containing your garlic, olive oil, salt, pepper and butter. Don't worry if water gets in--you want some. Pasta will absorb it. Mix the oil mixture into the pasta. Sprinkle half the cheese of top and combine. Then add the rest and combine some more. (At this point, I often just use my hands to mix everything.) Taste and add more salt and pepper if necessary. If you wish, add some freshly-minced parsley to it and sprinkle with a bit more cheese. If desired, sprinkle with a chiffonade of basil leaves.


TIP: To keep the pasta warm while you get the rest of the meal together, place a cloth dish towel over the pan of pasta water (be sure heat is off and away from other burners that may be on). Now set your bowl of pasta on top of it. The trick is not to let the bowl come into contact with the hot metal thus avoiding a crack. Cover the pasta with a sheet of cling wrap. Stir just before serving.

Enjoy.


Tuesday, September 1, 2009

Coleslaw


Coleslaw needn't be a boring affair. Often, it's too bland. Or sodden with vinegar. One wants to achieve that balance between sweet and tangy. If you like the coleslaw at KFC, you'll probably like this. It's a cinch to prepare and pre-packaged slaw mixes cut the prep time in half.


The word itself is a blend of Dutch and French. Kool in Dutch means "cabbage." Sla a reduced form of the French "salade." The blending is uniquely American--Cole-Slaw.

  • 1, 16-oz. bag shredded cabbage or 2, 10 oz. bags
  • 2, carrots, peeled and shredded
  • 2-4 tablespoons finely-minced parsley
  • 2/3 - 1 cup mayonnaise
  • 3 tablespoons vegetable oil
  • 1/2 cup white sugar
  • 2 tablespoons white vinegar or rice vinegar
  • 1/4 teaspoon salt
  • 1/2 teaspoon poppy seeds

In a very large bowl, combine cabbage and carrots.

In a medium bowl, whisk together the mayo, vegetable oil, sugar, vinegar, salt and poppy seeds. Taste. Add more vinegar if necessary.

Pour dressing over the slaw and mix thoroughly.

Refrigerate a couple hours before serving.

NOTE: You can use Miracle Whip salad dressing, but lessen the amount of vinegar called for.