Friday, January 27, 2017

Creamy Yellow Rice with Shrimp in the Pressure Cooker


Really, who would not want to have this set before them?

Shrimp is always a favorite of mine. It cooks up in minutes and lends itself to garlicky interpretations, with added notes of dill or basil or lemon. In the Instant Pot, it is a cinch to prepare and takes only 4-5 minutes for a stunning and delectable meal.

Use the largest shrimp you can find. Here, I used Argentina Reds. For more flavor, you can leave the shells on. I chose not to.

  • 1 pound frozen shrimp
  • 1, five-ounce packet Mahatma Saffron Yellow Rice
  • Long grain white rice, not instant
  • 3-4 cloves garlic, minced 
  • 2-3 tablespoons minced red onion
  • 1/4 teaspoon hot paprika or hot smoked paprika
  • 1/2 teaspoon freshly ground pepper
  • 1/4 cup minced fresh parsley
  • 1, 10.5 ounce chicken broth
  • Water
  • 4 tablespoons unsalted butter
  • Juice from 1/2 lemon 

Add yellow rice to a measuring cup then add white, long-grain rice until you have a total of 1 1/4 cup. Add to pressure cooker along with fresh and dry seasonings. Mix.

Add chicken broth to measuring cup. Add enough water until you have a total of 1 1/2 cups.

Dot with butter.

Layer frozen shrimp on top.

Secure lid to pressure cooker. Move vent to sealing position. Cook on high 4-5 minutes. Allow to sit around 2 minutes than release pressure manually. Shrimp will be noticeably smaller, so don't be alarmed.

Remove shrimp to a plate. Add 1/2 cup grated Parmesan to the rice mixture. Taste for seasoning, adding more salt if necessary (I added several pinches pink Himalayan salt). Plate rice with shrimp on the side or on top. Serve with additional lemon wedges.


Thursday, January 26, 2017

Coca-Cola Pot Roast in the Instant Pot Pressure Cooker


The sauce/gravy is amazing! Sweet from the cola, yet piquant from the chili sauce.

Late last autumn, I purchased an Instant Pot pressure cooker.

Why?

Well, since I returned to working full-time about a year ago  (as opposed to part-time "retirement" even though I was working full-time hours), I just don't have that much time to cook or to blog recipes when I would like. I figured the pressure cooker would solve that problem. And, on many levels, it has. As an example, this roast that would normally take 6-8 hours in a slow cooker only took 45 minutes in the pressure cooker. And it tastes better. Yes, you heard me correctly, only 45 minutes for fork-tender, flavorful meat!

Today's electric pressure cookers are not at all like those from forty or fifty years ago. I still remember my mom hefting this massive metal bomb from the bottom cabinet.  It hissed and spewed out steam like an old locomotive. Electric pressure cookers rarely shoot out geysers of steam, if any. Instead, they bring the recipe up to "pressure," and keep it electronically monitored so there is no steam during the cooking process until you "vent" the finished product. That's it. No bomb! And great for the summer!


Most electric pressure cookers are equipped with diverse settings. The Instant Pot, for example, serves as a steamer, slow cooker, rice cooker. It can saute. It also has settings particular to specific recipes such as soups, stews, and beans. The more expensive models even serve as a sous-vide!

But, what no pressure cooker can do is brown and sizzle. Pressure cookers are best for recipes that require lots of moisture which is needed to build up the pressure. You can saute/brown chicken breasts before adding to the pressure cooker, but the skin will still end up rubbery, not crisp. Some people remove the product to crisp under a broiler. To me, that just defeats the concept of a time-saving pressure cooker. But, what you can do .... invest in a mini blow torch specifically made for the kitchen. Brilliant.

Cooking under pressure reduces cooking time. What else does cooking under pressure accomplish? It intensifies flavor! Consequently, use fewer spices and aromatics. Especially salt and pepper.

Do not slice and dice your veggies. Leave in chunks, otherwise, they will just melt under pressure. You want them LARGE.  As an example, I love cabbage. We should all love cabbage and eat more. Do not "shred" it. Same with onions... Think one-inch slices, otherwise, under pressure, they will simply "dissolve" or "melt."


The recipe below can be prepared in the crockpot. Just cook on slow for 6-8 hours.


Coca-Cola Pot Roast


For this recipe, use Mexican coca-cola which uses sugar, not corn syrup. It is easily found in the Hispanic section of most grocery stores. Do not sub ketchup for the chili sauce.


  • 1, 3-pound chuck roast, trimmed if fatty 
  • 1, 12-ounce bottle Mexican coca-cola 
  • 1, 12-ounce bottle Heinz Chili Sauce 
  • 1 packet Lipton's Dry Onion Soup Mix 
  • Garlic Powder

Lightly dust the roast on both sides with garlic powder.  Nestle roast in the pressure cooker. Sprinkle the roast with the dry soup mix. Carefully pour in the soda around the roast. Cover with the chili sauce.


Secure lid on pressure cooker. Place the valve to sealing position. Cook on high for about 45 minutes. Allow to decompress naturally. Carefully remove the lid. If you want it a bit more fall-apart tender, re-place lid and bring to pressure for another five minutes or so. When finished, remove roast to a serving plate. Mix juices and pour into a bowl for serving.

Serve with mashed or boiled potatoes or broad egg noodles.


Monday, January 9, 2017

Kitchen Bounty: Chili with Cheddar-Cheese Biscuits

Kitchen Bounty: Chili with Cheddar-Cheese Biscuits: There are two foods, maybe three, for which no two people will ever agree how to prepare: meatloaf and chili (the third is ribs). I suppose...

Monday, June 20, 2016

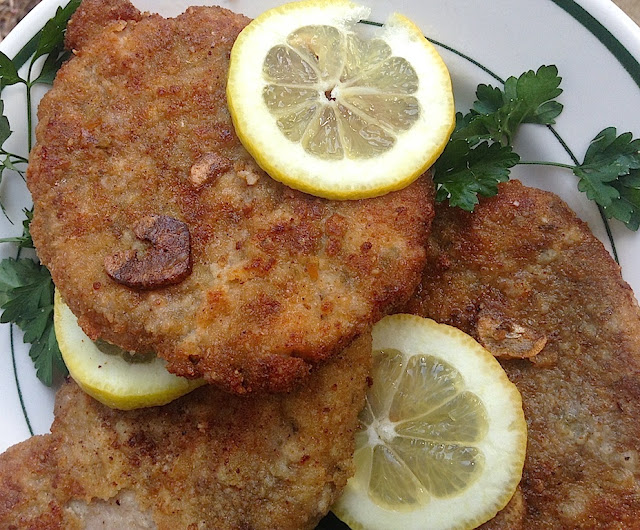
Baked, Breaded, Pork Cutlets


Don't be put off by the fennel or the lemon! They are pure Italian!


Of course, first a story. When I was a middle-aged starving artist with a small gallery/gift shop in Michigan, I was fortunate to have a freind who was a contractor. Why fortuanate? Well, during the lean winter months when there were no tourists, I worked mostly as his "gopher" on large projects that kept me employed and paying the bills.

Eating out on lunch breaks was the norm. You know, the usual fast-food places. Eventually, it was easy to get sick of them. One day, I prepared a mess of these cutlests with a side bowl of seasoned rice. We always had a microwave handy. Well, one of the workers went bonkers over these. Back then, I really did not have a recipe, just a method. I'm not sure if I even used the fennel. He just begged and begged for the recipe.

Anyway, breaded pork cutlets have always been a favorite of mine. They are pretty easy to prepare and lend themselves to a variety of savory seasonings, either dried or fresh. There was a time, when I was a young teacher, that a one-pound package was less than two dollars! Still, they are pretty inexpensive!

Since then, I have adopted this recipe more along an "Italian" recipe. Pork for Italians would always include fennel and lemon. Don't be put off. Remember, Italian sausage is mostly fennel which gives it such a great and unique taste.

Cut from pork loin, look for cutlets that have some marbling (white fat streaks) in them, a bit of fat on the edge (the more the better), and that are no more than 1/2-inch thick. Especially seek cutlets that have a lot of "red." That means they were cut close to the pork tenderloin. Usually, there are about 4-5 to a pack, a bit over a pound.


It is important to season the meat, not the flour. I like my bread-coating a bit on the salty side. I also like to add sliced garlic to the oil for a bit more flavor. During the browning, I sometimes add a sprig of rosemary and thyme for added flavor. If you can't find savory, just omit or use a spinkle of oregano. Savory tastes like oregano, but it is much milder in taste.

These are also great cold as a sandwich or on a biscuit. The method is pretty simple:
1. Season
2. Dip in flour
3. Coat in a wet wash
4. Coat in bread/cheese crumbs
5. Lightly fry to brown
6. Finish off in an oven


  • Rub for 4-5 Cutlets (and this is Approximate):
  • 1 teaspoon onion powder
  • 1/2 teaspoon garlic powder
  • 1/2 teaspoon dried thyme leaves
  • 1/2 teaspoon powdered savory
  • 1/4 teaspoon fennel seed, crushed (do not omit)
  • 1/2 teaspoon pepper or freshly cracked pepper
  • Self-rising flour, about two tablespoons per cutlet, for dredging.
  • Coating:
  • 2 eggs slightly beaten with one tablespoon of water or 
  • 2 eggs slightly beaten with one tablespoon of mayonnaise
  • Combine on a plate:
  • 1 cup plain, fine-sifted breadcrumbs
  • 1/4 cup canned Parmesan cheese
  • 1 tablespoon Kosher salt
  • Oil:
  • A good one-half inch of olive oil or vegetable oil ... or melted lard ... or a combination thereof depending on size of your pan
  • 1 small garlic clove, thinly sliced
  • 1-2 rosemary sprigs (optional)
  • 3-4 thyme sprigs (optional)

With a damp cloth or paper towel, wipe each side of each cutlet. Season both sides, with spice mixture, pressing the seasonings into the meat.


Gently coat each cutlet in flour. Lay aside.

Dip each cutlet in the egg-wash mixture and then dredge in the coating mixture being to sure to coat evenly. Lay aside for about 15 minutes to allow coating to set up and to adhere. Why? When you fry them, you don't want the coating to separate from the meat.

Once coated, allow the cutlets to sit at room temperature for at least fifteen minutes.

Pre-heat oven to 375-400 F. degrees. Line a small cooking tray or cookie sheet with tin foil. Spritz with cooking spray.

Warm oil in medium-large skillet over medium heat. Just before adding the cutlets, add thin-sliced garlic. If desired, add rosemary or thyme sprigs.When garlic begins to turn brown you can either remove it or add cutlets. Gently fry on each side for about 1-2 minutes, just until golden brown.  Remove and drain on paper towels.


Place cutlets on sheet and bake at 375-400 F. degrees for about10-20 minutes are so, flipping halfway through. Allow to rest ten minutes. Serves with lemon slices.
