Monday, July 10, 2023

Sour Cream and Clove Pork Chops


You are just going to have to trust me on this recipe. I found it in my grandmother's old World War II cookbook years and years ago. I loved it. Then I kind of forgot about it.

I used to write a column for a local newspaper and recently came across a short note a reader had left me that I had tucked away in a cookbook expressing her admiration for the recipe. But, apparently, not as much as her friend she shared it with "who makes it at least once a week and is addicted."

I am typing the recipe exactly as it appeared in the cookbook. I suggest making it as is before altering or adding to it. Suggestions are in the notes below.

The recipe is easily halved, but I suggest making all the sauce to use over mashed potatoes or rice. Even a good biscuit.

My pork chop of choice is a "rib end" pork chop. Depending where you live, they may not be easily found. At any rate, I like the extra fat and taste it brings. Don't use skinny boneless chops. I cook mine to about 145 F degrees. I like my pork to still have a tinge of pink. Recommended is 160 degrees.You do you.

Please note, "clove" here does not refer to a garlic clove, but an actual whole clove--the kind used at Christmas for holiday baking. It, along with the sugar and vinegar, creates a kind of white, simple "barbecue sauce." 

"Season" your flour how you like it. I use salt, pepper, garlic and onion powder.  

Savory is not always easy to find. You can sub marjoram, dried sage leaves or, in a pinch, oregano.

  • Prepare for cooking
  •     4 loin pork chops, 1/2-inch thick.
  • Dredge them with
  •     Seasoned flour.
  • Insert in each chop
  •     1 whole clove.
  • Brown them lightly in a little hot pork fat or lard. Place them in a baking dish. Combine, heat and pour over them:
  •     1/2 cup water
  •     1 bay leaf
  •     2 tablespoons vinegar
  •     1 tablespoon sugar
  •     1/2 cup sour cream
  •     1/4 teaspoon savory
  • Cover the dish. Bake the chops in a moderate oven of about 350 F degrees for about one hour or until done. Remove cloves and bay leaf.

I think one hour is a bit long. Usually 30-40 minutes does it. As the sauce cooks, it will appear curdled. That is normal. Just re-stir. Plain white vinegar is fine. It is important to keep this covered as it cooks.

This is not a pretty dish. If I have a red onion on hand, sometimes, I will take a few slices of "rings" to throw over chops as they cook. It adds some color. I have also taken small canned new potatoes, cut them in half lengthwise, and tucked them in about halfway through cooking. Whole sage leaves make for an attractive garnish. 


Friday, June 2, 2023

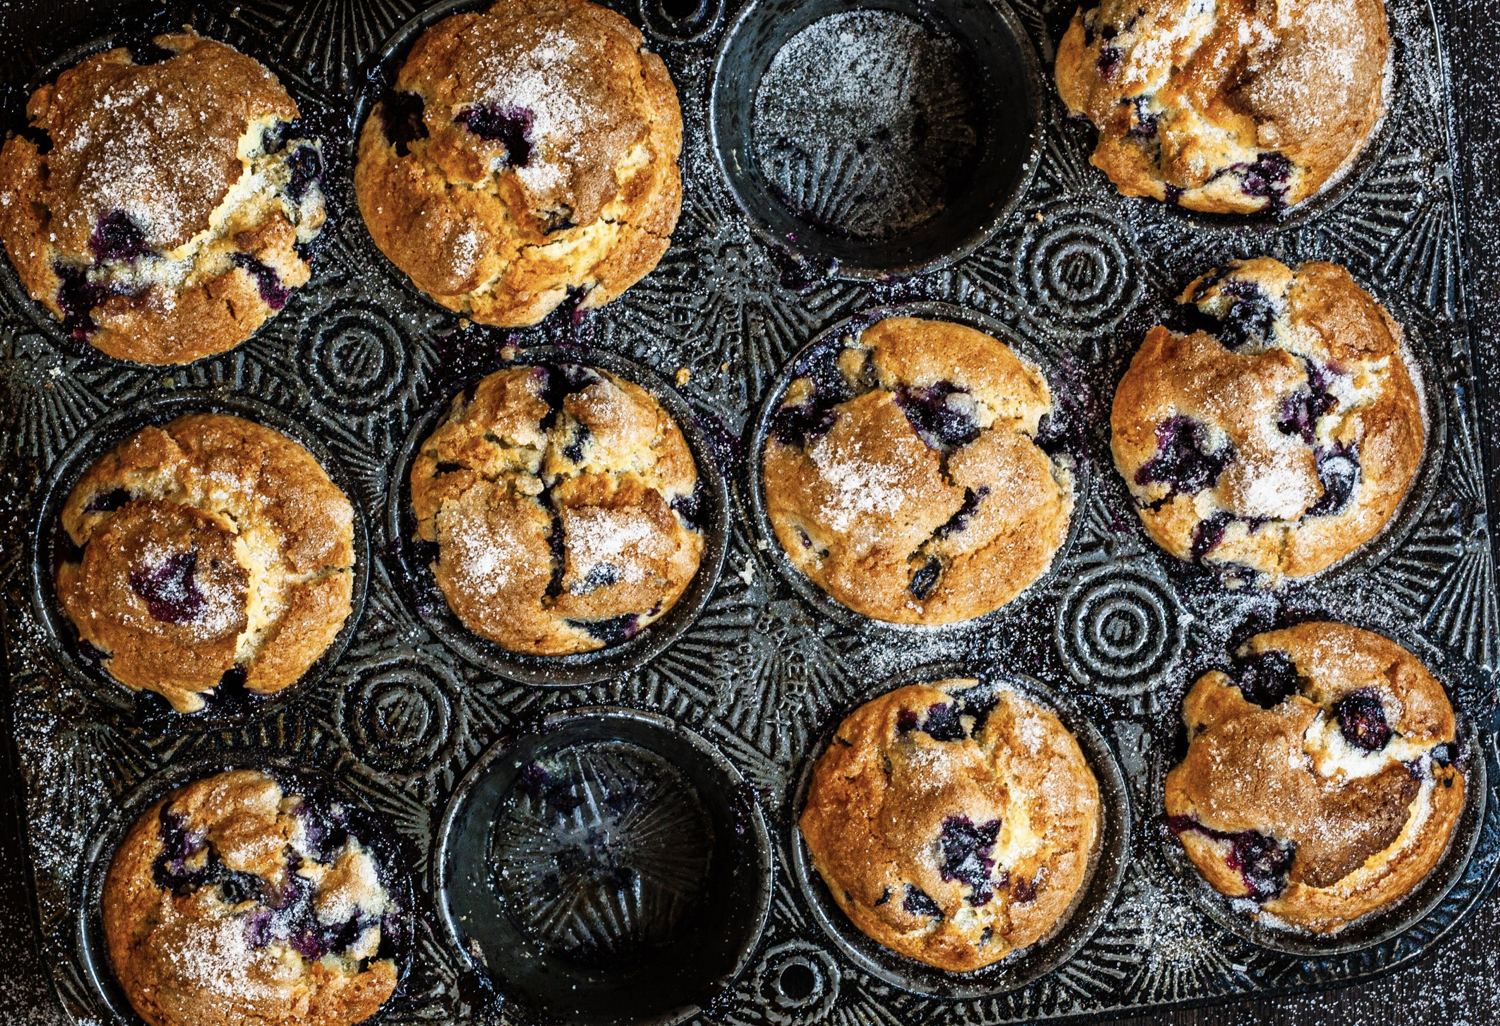
Jordan Marsh Blueberry Muffins

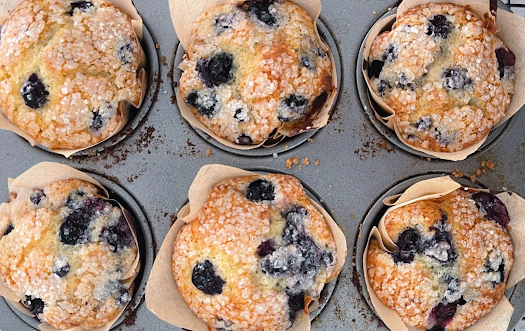
For a trendier presentation, cut baking parchment into squares. Use the bottom of
a glass or jar to push into each cavity to form a liner.


A blueberry muffin will only be as good as the blueberries in it. If using fresh, be sure they are not "soft or mushy." They should be plump, sweet. And they should taste like blueberries. Many do not.

Now is the time is to whip up a batch when blueberries are their most flavorful.  Here in the South, we are having a cool spring. Hooray! That means blueberries have much more flavor. Including strawberries. Heat and berries just do not go together. By the time it does get hot and humid, berries from the North will be available and those from the mountains nearby.

I worked in many produce departments and I can honestly say that I have never had a great tasting blueberry from South America. Never. 

I've used several blueberry muffin recipes through the years, but I've settled on this one which has a bit of history behind it. Apparently, in the mid 1980s, there was a bit of a blueberry muffin competition in The NY Times Food Section. They championed a blueberry muffin recipe from The Carlton Ritz only to be schooled by readers that the best blueberry muffins were from the now defunct Boston department store Jordan Marsh.

Jordan Marsh won.

I used to make American Test's Kitchen recipe but have since found it is really based on the Jordan Marsh recipe but a bit more fussy (they cook down the mashed blueberries until a jammy syrup is formed).

 When baking only 10, keep the two middle cups empty.

The Jordan Marsh recipe mostly floating around the Internet is close to the original, but not quite accurate. There is a video of a reporter interviewing the famous "baker" John Pupek, who made these muffins for 30 years. After reviewing the video a number of times, a baker noticed several major differences from the Internet recipe and made three attempts to duplicate these muffins as close to the original as possible. Their proportions are the ones I give in the recipe below. Here are the major differences: 

FLOUR: The original recipe, without a doubt, uses two types of flour: one cup bread flour and one cup pastry flour. I'm not a pastry baker. I've never purchased pastry flour. I've never seen it in the grocery store. I doubt I ever buy at all. But you can make your own, if you have cake flour. The ratio is 1/2 cup AP flour mixed with 1/2 cup cake flour. (If all you have on hand is AP flour, fine. Just note that the texture will be a bit different than using the recommended two cups of different flour. You do you.

FATS: In a video where the original baker talks about his famous recipe, you can hear him talk about creaming "shortening." Now, to be fair, it is not uncommon for bakers to call any solid "fat" shortening. Remember, these were produced on a major, industrial scale. From a profit point-of-view, I find it difficult to believe they used all butter. And, in the video, you can see the creamed sugar and shortening is "butter-colored." Unlike butter, shortening has less, if any, moisture. 

BERRIES: In the video, they use frozen berries. They are also sure to mix them with some of the flour mixture before adding them to the batter.

EGGS: The authentic recipe used "fortified" eggs. Eggland brand is an example. I'm passing on that one. But it is suggested to add one at a time, scraping down the bowl as necessary. You want to incorporate air into the batter.

FILLING and BAKING: It's agreed to fill paper-lined muffin cups to the top, a bit domed. This will make a well-rounded muffin. Bake at 400 F degrees for five minutes, then lower temperature to 375 and bake an additional 25 minutes.

TOPPING: In the video, they use A LOT of white sugar to top each muffin. Some people use turabando sugar for more crunch. The call is yours.

Hope that is not too confusing. Now, on to the recipe:

  • 4 tablespoons butter, softened
  • 4 tablespoons vegetable shortening 
  • 1 cup granulated white sugar
  • 2 whole 'fortified' eggs
  • 1 teaspoon vanilla extract
  • 2 1/2 cups blueberries (frozen is fine, but thaw 1/2 cup)
  • 1 cup bread flour
  • 1 cup pastry flour or
  • (1/2 cup AP flour
  • 1/2 cup cake flour) see notes above
  • 2 tablespoons extra flour (any kind) set aside
  • 1/2 teaspoon table salt
  • 2 teaspoons baking powder
  • 1/2 cup whole milk
  • 2 tablespoons granulated white sugar for tops

Preheat Oven to 400 degrees F with rack in middle of the oven.

  1. Spray a 12-cup muffin tin with baking spray. Using shortening, also grease the top of the pan. Place ten paper liners in sprayed cups, leaving the two middle cups empty. Do not attempt to bake these without paper liners or they will fall apart because of their high moisture content.
  2. In a large bowl or mixer, cream butter and shortening until fluffy.
  3. Add sugar and beat on medium for a good minute or more until light and fluffy.
  4. Add eggs, one at a time, scraping down bowl as necessary. Beat for about 2-3 minutes. Important to whip air into the batter.
  5. Add vanilla and and beat for a few more seconds to combine.
  6. Remove 1/2 cup of blueberries to a small bowl and mash. Set aside. (If using frozen and you have too much juice, discard some, but not all.)
  7. Sprinkle remaining blueberries with the 2 tablespoons of flour to coat.
  8. Mix flours with salt and baking powder.
  9. Begin adding flour mixture and the milk a little at a time with mixer running. Once they are both in, DO NOT MIX FURTHER otherwise muffins will be flat and tough.
  10. Fold in mashed berries. Fold in whole berries (if using frozen, include any juices that have accumulated).
  11. Using an ice-cream scoop, divide the mixture between the ten prepared muffin papers, piling high above the rim.
  12. Sprinkle with the 2 tablespoons sugar.
  13. Place in oven. Bake for five minutes then reduce oven temperature to 375 and bake for 20 more minutes. If your oven heats unevenly, rotate pan halfway. Do not over bake. Because of blueberries, the "toothpick" test does not really work. If you don't have to open door, don't.
  14. Remove to a rack to cool.
  15. Once cool, gently pry the muffins out by making sure the overhang did not stick to pan top.


 Fresh butter, cream cheese, or plain. Which is your favorite?


P.S.
Many people have noted that this is actually a coffee cake "masquerading" as a muffin. And they are correct. Most cake batters and coffee-cake batters can easily become muffins. And vice-versa. 

Instead of muffins,  spread batter in a greased 8x8 cake tin.  Sprinkle with the sugar. Bake at 350 for 35-40 minutes, a few minutes less if using convection. 

I've only found a few recipes and they differ on the amount of blueberries to add. And neither says anything about mashing a proportion. One adds one-and-one-half cups whole berries, the other adds all 2.5 cups. For a coffeecake, I  probably would not add all 2.5 cups. 


Wednesday, May 3, 2023

Strawberry-Rhubarb Buttermilk Coffee Cake


One of the first things I ever planted while growing up was rhubarb. It was a sure thing every spring with little trouble. Always set in a corner to give it plenty of growing space, it was guaranteed to give any child gardener confidence with its gigantic, exotic leaves and stalks as red as any Radio Flyer wagon.

Alas, here in the South, because of the heat, it is a rare find in any garden. Or grocery store. When I worked in a produce department, it shipped from Washington State and was actually available year-round. "Yankees" were always thrilled to find it for their annual spring strawberry-rhubarb pie.

Pairing it's tart taste with sweet strawberries is a match made in heaven. I tend to use more berries than rhubarb. You do you.

I first made this coffee cake while I was staying with my sister and her family. After her second piece, she put on her slippers buttoned up her robe and trotted across the street to share it with her neighbor. 

It is like something one would find in a good bakery. Use a quality butter.

I prepare the filling and the topping the day before. And I do use frozen berries but throw in some fresh ones, mashed..

It has been a cool spring here in the South (I'm not complaining) and rhubarb picked from the mountains is a plenty at farmer markets. I choose the smaller stalks.

This dough is thick, be forewarned. Drop by small tablespoons before attempting to spread it smooth. Use an off-set spatula or, if you don't have one, use a butter knife.


Preheat oven to 350 F. Lightly grease a 13 x 9-inch baking dish.

  • For the Filling:
  •  cup sugar
  •  cup cornstarch
  • 2 cups chopped rhubarb
  • 1 (10 ounce) package frozen sliced strawberries, thawed
  • 2 tablespoons lemon juice
  • For the Cake:
  • 3 cups all-purpose flour
  • 1 cup sugar
  • 1 teaspoon baking powder
  • 1 teaspoon baking soda
  • 1 cup cold unsalted butter, cut into pieces
  • 1 cup buttermilk
  • 2 large eggs
  • 1 teaspoon vanilla extract
  • For the Topping:
  • ¾ cup sugar
  • ½ cup all-purpose flour
  • ¼ cup cold unsalted butter, cut into pieces

In a medium/large, heavy-bottomed saucepan, mix the sugar and cornstarch. Add rhubarb, strawberries. Bring to a slow simmer over medium heat and cook for about two minutes until thick. Remove from heat. Stir in lemon juice. Allow to cool. If making ahead, cover well and refrigerate. This must be brought to room temperature the next day to be able to spread evenly and easily on the batter, so keep that in mind.

For the cake: combine dry ingredients in a large bowl. Cut in the butter until coarse crumbs form.
In a small/medium bowl, whisk together the buttermilk, eggs and vanilla. Stir wet ingredients into dry ingredients just until moistened. Avoid overmixing.

Spoon 1/2-2/3 batter into greased dish. Spread filling on top. Cover with remaining batter. Batter is thick, so this requires some patience.

For the topping: Simply combine sugar and flour. Cut in butter until mixture resembles large crumbs. You want crumbs, not a dough batter. 

Sprinkle crumbs on top of cake. Bake 45-50 minutes or until toothpick comes out clean. Allow to cool before cutting. 

Some suggest making a bit more filling than necessary to serve alongside slices. I don't think it is necessary.

Enjoy!

Panera used to sell mini loaves of something similar--if not the same. So that is another option. Baking times will not be the same.

Notes: Rhubarb freezes well. I cut into chunks and store in 1-cup and 1/2-cup increments. 

Thursday, April 20, 2023

Easy Weeknight Italian Sausages


I no longer buy what I call "grocery-store ground beef". Lately, I have not been happy with it. Instead, I buy the pre-formed hamburger patties and use that. It is quality beef, not something leftover that the store grinds up to get rid of. It has been worth the extra money. Until now. 

On this day, I had planned on getting one pound of ground beef. But one pound of those pre-formed patties hovered at ten bucks! No thanks!

It upset my dinner plans and shopping. What to do? Voila! Italian sausages were on sale for 4.99 a pack. And it was a brand I like. I scooped them up along with a large green pepper, red onion, and a can of fire-roasted tomatoes, a loaf of Italian bread.

Dinner!

This can be done stovetop. You could put it in the oven, but if you're home it is satisfying to have something simmering on the range. Going back and forth to see how it's doing. A taste here and there ... a bit of seasoning ...

This is not a thick, spaghetti-like sauce. It is more brothy and, I think, cleaner.

Be sure to slice the garlic. It is a bit more mellow as it simmers in the pan. If it's in your budget, colored peppers add a nice touch ... otherwise, green is just fine.

You could certainly also add black olives and/or mushrooms.

I now douse all fresh meat purchased from the grocery store with boiling water. Many processing and shipping measures have been ... "relaxed." IMHO.


  • 1 lb. Italian sausages (I used mild) just under one-pound
  • 1/2 green bell pepper, sliced into ribbons, some cut in half
  • 1/2 large red onion, sliced
  • 1 garlic clove per sausage, peeled and sliced
  • 1 14.5-ounce can "fire roasted" tomatoes (I used Hunts)
  • 1 tablespoon Italian spices or "to taste)
  • Pinch or two of Aleppo pepper flakes (fewer if using red pepper flakes)
  • Water
  • Butter

Heat a kettle of water to boiling. Pour over sausages in a colander. Douse a few times. Remove and pat dry.

Meanwhile, heat a large frying pan. Add a bit of oil and add sausages. Be prepared for splatters. Over a medium, medium-low heat, fry sausages just until they begin to turn brown on at least two sides.

About halfway, add your onions, bell peppers, sliced garlic. When they begin to go limp, add your can of fire-diced tomatoes with juice. Sprinkle with Italian seasoning of choice. Add about 1/2 can of water. Give a good stir. Reduce to simmer and slowly cook for about 2 hours. 

Just before serving, melt in a couple tablespoons butter. 

Serve as is or over rice/pasta. Great with a side of garlic bread, fresh salad and/or melon.

This is easily doubled or tripled (be careful of the garlic and Italian seasonings, though) and great for a picnic instead of the usual hot dogs.