Monday, August 29, 2011

Baked Salmon


I like my salmon simple. Herbs. Salt. A bit of seasoning. Good olive oil. A lemon twist on the side. Of course, it all depends on the quality of the salmon. Lately, I've been getting the some of the best salmon I've ever had from my grocery store. It's fresh, not frozen, Atlantic salmon. It's light in color and the texture is at once buttery and velvety with a very mild taste. 


If you follow my blog, you know I'm an advocate of Fines Herbes. And fines herbes is the essence of this recipe. They temper the fish with just the correct degree of flavor without overpowering it. Heating the pan in the oven first gives a crisp skin. 

I serve this with a wonderful pre-packaged blend of veggies and rice from Bird's Eye. It's a combination of brown and white rices, corn, carrots, and peas. It has no nasty "sauce." Nuke it for 3 minutes or so, in its own bag, and it's done. Add any sauce or dressings you want. I drizzle with a bit of Lee Kum Kee soy sauce (don't use grocery store brands--yuck!).

Serves 1-2

  • 3/4 - 1 pound fresh salmon fillet with skin
  • Fines Herbes (equal amounts of dried chervil, parsley, tarragon and chives)
  • Dried dill
  • Kosher salt
  • Pepper
  • Garlic powder
  • Extra virgin olive oil


Preheat oven to 350 F. While pre-heating, place a shallow pan inside.

Using a wet paper towel, wipe both sides of the salmon. Drizzle the flesh with a really good olive oil. Lightly sprinkle with a bit of garlic powder and then dried dill. Sprinkle evenly with fines herbes. Using your fingers, lightly tap the herbs into the fish so that they soak up the olive oil.  Give a slight sprinkle of Kosher salt and fresh-cracked pepper.


Using a sharp knife, cut off the thin part of the fillet. Place on top of the thicker part, skin side up. Sprinkle the skin with just a bit of Kosher salt.
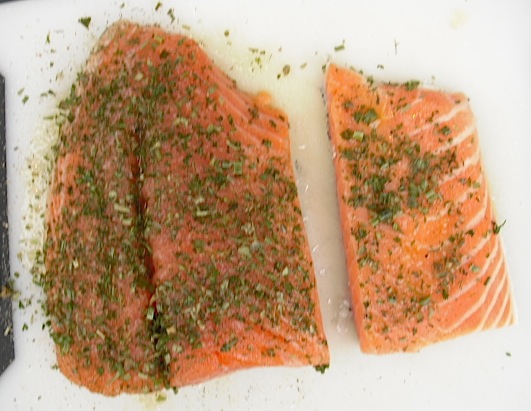


The thinner piece of salmon can overcook quickly.
By removing it and placing it on top of the thicker piece,
it stays moist.


Using a pot holder, remove the hot pan from the oven. Drizzle with a bit of olive oil and sprinkle with Kosher salt. Place the salmon, skin side down, into the pan. Bake for about 20 minutes or so and certainly no longer than 30 minutes. As soon as it begins to flake, it's done. The middle should still be a bit rare and juicy.

The bottom ends have begun to flake. The "spine"
or middle part of the salmon on the left is liquidy. The "white spots"
are the fish oils.

Remove. Serve with lemon slices.

Notes: You don't have to cut off the thin part of the fillet. But I find it usually overcooks if left intact. 



Monday, August 22, 2011

Baked Chicken Wings

Oh, my. I did enjoy these . . . 

I've been making wing recipe after wing recipe trying to find one I really like (Buffalo Wings are for a later date). I tried Asian-inspired. I tried Italian-inspired. I tried fresh herbs. Lemon. Garlic. Finally, I decided to just wing it (sorry, couldn't resist the pun) and used ingredients I like.

North Carolina doesn't allow grills in apartment complexes, so I'm limited to my oven. One recipe I tried would have been dynamite--if the wings were grilled. But in the oven, it just didn't work. 

I love chicken wings. They are tender and juicy with little fat. The Fines Herbes used here add just the right blend of taste. When baking, as opposed to grilling, I found less garlic was better than more because in the oven wings don't bake for a long period of time and there is no "flame" to sear and mellow the garlic.

Many recipes called for baking wings at a high temperature of 400-425. I thought it dried them out too fast. And  I realized I really wasn't after a "crisp" wing as much as I wanted one that was flavorful and still juicy and "buttery." The rough-grated Parmesan at the end of baking does give a note of "crispness" if you want. But, again, it was the subtle taste I wanted.

A six pack of wings on sale can be had for about 2.50, and that's how I purchased all my wing "experiments." A real bargain. 

  • Six chicken wings
  • 1 good tablespoon Fines Herbes*
  • 1 small garlic clove, squeezed through a garlic press or finely minced
  • 2 tablespoons melted butter
  • 2-3 tablespoons olive oil
  • 1/4 - 1/2 teaspoon Tabasco Sauce or to taste
  • 1/4 cup rough-grated Parmesan cheese
  • 1/2 teaspoon Kosher salt
  • Freshly ground pepper


Wash, drain and wipe dry the chicken wings. Cut off the tips (and freeze for making chicken stock).


In a small bowl microwave the butter just until melted. Add the Fines Herbes and garlic. Stir. Add the olive oil and 1/2 teaspoon Kosher salt and Tabasco. 

Place wings in a large, sealable plastic bag. Add the butter-herb mixture. Squeeze out air and massage the the wings until they are evenly coated.


Marinate for at least two hours, refrigerated. About 30 minutes before baking, remove wings from fridge and run entire, sealed bag under hot water to de-congeal. Give another good "massage" and allow to sit for about 15 minutes or so.

Preheat oven to 375 F degrees. Line a baking sheet with foil that has been sprayed with non-stick oil. Evenly space wings squeezing out as much "sauce" as possible to evenly coat the wings. Sprinkle with freshly-grated pepper.


Bake for 20 minutes. Remove from oven and raise temperature to 400 F degrees. Sprinkle grated Parmesan over wings and return to oven. Bake an additional 15 minutes until cheese begins to melt and turns golden.


Remove wings from oven and allow to stand at least 15-20 minutes.

For this batch, I used a finer grate of cheese. I prefer
the rough-grated as pictured above.

*  Fines Herbes  is a blend of chervil, parsley, chives and tarragon in equal amounts. I usually just make own using dried herbs. I make a large quantity and keep in a Ziploc bag. If you don't have them, just use one good teaspoon each of the above dried dried herbs to make this recipe.

Notes: For the cheese, I used Grano Padano which isn't as salty as Parmesan. Don't use a crappy cheese. Serve these with simple buttered white rice, green vegetable and chilled dry, white wine.


Friday, August 12, 2011

Bacon-Wrapped Chicken with Sage Leaves


These are fun to eat with your fingers. Cut in half, they'd make great hors d'oeuvres.

Here's a nifty and simple recipe that I'll be making again. I grow "purple sage" which is what I used. This is the kind of recipe that is more a "procedure" than ingredients exactly measured out.


  • Fresh sage leaves
  • Chicken tenders
  • Seasoning (I used garlic powder, Lawrey's,  Bell's Seasoning*, and freshly cracked pepper)
  • Bacon, one slice per chicken tender
  • Olive oil


Wash and pat dry the chicken tenders. If large, snip out the white tendon. Lightly season with seasoning of your choice. Place sage leaves the length of the tenderloin.


Wrap each with bacon. If your bacon has "fatty ends," trim. Wrapping can be a bit tricky. I found it easier to lay the tenderloin on top of the bacon, about an inch or two below the top end. Fold that end down on the chicken and then begin wrapping the the long end around it, raising the chicken up from the board as you go and stretching it a bit as you wrap it.


Grind fresh pepper over the wrapped chicken. Heat a pan over medium-low heat and drizzle just a bit of olive oil in the pan. Place bacon-wrapped chicken, sage side down. Fry until brown, about 6 minutes or so. Flip and crisp the other side. Remove to paper towel to blot and serve warm. 

Notes: This is adapted from "Everyday Food." They used one large sage leaf per tenderloin and really didn't season the chicken. It's up to you. As an experiment, I did use pancetta with one which made wrapping easier, but I preferred those made with the bacon. I wouldn't grill these. Why? You want the sage leaves to 'crisp' as they fry. Grilling would just burn them.

*I love Bell's Seasoning. It is heavy on the rosemary and perfect for any poultry. And the little box is just beautiful packaging.


Wednesday, August 3, 2011

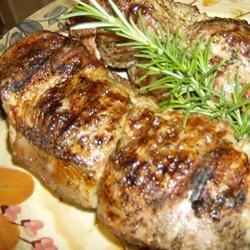
Grilled Pork Tenderloin with Rosemary and Garlic


You really need a grill for this recipe, either gas or charcoal. I've made it in the oven, but it's not half as good. I've also seared it in a cast-iron skillet and then finished it off in the oven. Better, but not the same as seared over an open flame. Fire does magic to rosemary and garlic and adds needed smokiness to the pork itself so all the ingredients roast into one great recipe. Sometimes I put a branch of rosemary on top of the pork as it roasts so the heat releases the oils.

This simple marinade isn't overpowering and complements the delicate pork taste. Look for tenderloins on sale. Usually, there are two per pack. And don't confuse pork tenderloin with pork loin--they are two different cuts of meat, the tenderloin living up to its name--more tender and very lean, but usually quite moist. If you are having guests, this is a great recipe. You can marinate the meat the day before and grilling is a snap. Several tenderloins will feed quite a few people.

I like my pork grilled until there's just a hint of a pink blush in the center--around 145 F. (It will continue to cook when resting. When done,  remove from grill and place on plate. Tent with foil and allow to rest about ten minutes. Save collected juices and add just a tad of water and a teaspoon of butter. Microwave just until bubbly. Cut the meat into thin slices and drizzle gravy over the top.
  • 2, 3/4 lb. pork tenderloins
For each tenderloin:
  • 1 large garlic clove
  • 1 teaspoon Kosher salt, divided
  • 1/4 teaspoon ground pepper
  • 2 teaspoons fresh rosemary, finely minced
  • 1/2-1 teaspoon minced thyme leaves (optional)
  • 1-2 tablespoons olive oil
Finely chop the garlic. Leaving it on the cutting board, add 1/2 teaspoon salt. Using the flat end of your knife and, working it back and forth, work the salt into the garlic forming a kind of paste. Or just use a mortar and pestle.

Remove to a small bowl. Add rest of ingredients and mix. Coat the entire tenderloin with the mixture. Sprinkle the top with about 1/2 teaspoon of Kosher salt. Wrap in plastic wrap. Refrigerate for at least several hours (I've gone as long as two days.)


About 30 minutes before grilling, remove from refrigerator and unwrap. Keep the marinade mixture on the meat.

It there's a thin "tail" on the tenderloin, fold it under and secure with a toothpick or tie it in place to create a uniform, round tenderloin.

Pre-heat grill and cook on moderate, about 350 if using a gas grill, turning every once-in-a-while until done. I like 145 F, for safety, they say about 160 F degrees, anywhere from 20-30 minutes depending on thickness of meat.

Makes great, cold sandwiches if there's any leftover.

Notes: If at all possible, use "home-grown" rosemary. The flavor is more pronounced and sharper than store-bought. The older the rosemary bush, the better the taste.