Tuesday, September 20, 2011

My Favorite Baked Chicken Leg Quarters


Note how the meat of the lower leg has pulled away from the bone.
That means it's done. It's important to baste the last 25 minutes
to achieve this golden, brown skin. And you want just a bit
of that blackened spiced mixture.


(Update, June 13, 2012: Wow, I'm glad to see this as one of my top recipes! I make it all the time and hope you enjoy them as much as I do!)


I snagged a five-pound bag of chicken leg quarters at my grocery store on sale for only 2.99! That's a whole lot of eating for little money. And it's a brand I like. The quarters are both meaty and juicy.

You'll need a garlic press for this recipe. You want your garlic to be a "paste." Why? Well, when garlic is a paste, it's not apt to burn the way minced garlic will. If you don't have a press, simply mince your garlic fine and then put the salt on it and, using the broad side of a knife knead it back and forth, working the salt into the garlic until a paste is formed. Or just use a mortar and pestle.

I gnaw these babies to the bone and lick my lips!

  • 2 leg quarters
  • 2 large cloves garlic, pressed
  • 3/4 teaspoon dried thyme
  • 3/4 teaspoon Old Bay's Seasoning
  • 1/2 teaspoon Kosher salt
  • Pepper, freshly ground
  • 1/4 heaping teaspoon ground cumin
  • 2-3 teaspoons olive oil
  • 1/4 teaspoon Tabasco Sauce
  • 1 tablespoon butter 
  • 1-2 tablespoons (about) dry white wine


Pre-heat oven to 375 F. degrees

Remove any excess fat from leg quarters and rinse well under cool water. Pat dry with paper towels. Place in a shallow baking dish. I prefer metal.

In a small bowl mix the garlic, thyme, Old Bay's, salt, cumin, Tabasco, and several good grinds of fresh pepper. Add olive oil a teaspoon at a time. Using the back of a spoon, mash all the ingredients together to kind of form a paste. Taste. The garlic flavor should be in the forefront along with some heat.

Coat the chicken evenly with the spice mixture.
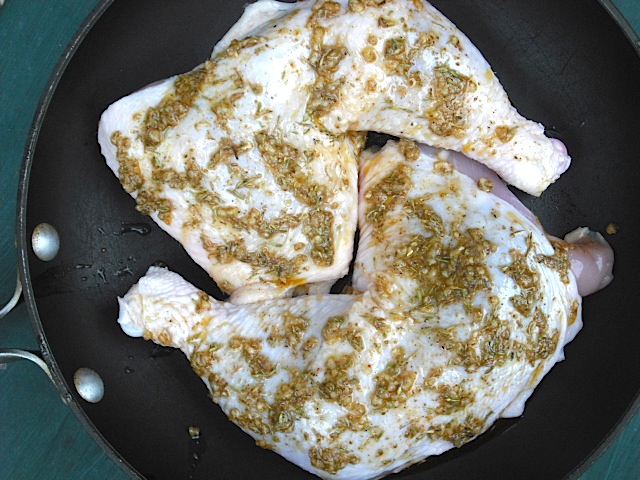


Place pan in oven and bake at 375 for 20 minutes. After 20 minutes, remove the pan from the oven. Raise the temperature to about 425. Splash in two tablespoons dry, white wine into pan and one tablespoon butter. Swirl it around a bit to mix with the juices. When butter is melted, baste the leg quarters with the "sauce." Return to oven and continue to bake for an additional 25 minutes, basting several times. Basting is important to get that golden-crisp skin. I leave in oven for ten minutes then baste. After that, I baste two more times every five minutes.

Remove from oven and allow to rest 20 minutes before serving. I find I enjoy these much more after sitting for 20 minutes or so. Just out of the oven, they're too hot to handle. I like to be able to pick one up and bite into it to get a  mouthful of crispy skin and juicy meat.

Chicken quarters should be cooked to an internal temperature of 165-170 F degrees. Because they contain much cartilage and fat, they are forgiving if you cook them longer. 

Notes: If your legs quarters are on the small side, reduce cooking time by several minutes. Try to cook leg quarters that are about all the same size. I've also done this with just thighs. 



Thursday, September 15, 2011

Turkey Broth with Rice and Carrots (Don't throw out that turkey carcass!)

Cooking is just as much about beautiful as delicious.
And this is already both! Turkey necks are no longer cheap,
so don't throw away that turkey carcass!

No canned soup can even begin to compare with homemade. And there's nothing more comforting than the rich aroma of a homemade pot of soup simmering away and filling your home with that tantalizing scent. Served with a crusty, artisan loaf of bread and a salad, it's a meal in and of itself. And leftovers just get better and better. If you want "noodles" or what we here in the South call "dumplings," here is the recipe: turkey-soup-with-dumplings

If you can find them, I highly recommend REAMES brand frozen noodles. I also recommend dried Italian Pappardelle noodles. They are extra-wide and lovely in soups and stews. They usually come in small "nests" or rounds. Don't break them up. Great for slurping . . . 

Turkey soup is one of my favorites. It has a depth and richness difficult to achieve in a chicken broth. And it's easier to find turkey "parts" than chicken parts. Here I've used turkey necks. Five turkey necks will give a good quart of soup. You don't have to use fresh herbs. Or, use your turkey carcass, but cut it up best you can so the bones can leach more flavor into the broth.  A cleaver makes easy work of it.

This is a basic turkey stock. From it, you can make all kinds of soup and it's easily doubled.

For the Stock:
  • 1 1/2 pounds turkey necks (about 5-6) or turkey carcass or a combination
  • 1/2 large yellow onion, roughly sliced, peels and all 
  • 1 1/2 stalks celery, roughly chopped
  • 1 1/2 carrots roughly chopped, no need to peel
  • 1 small clove of garlic either sliced or just smashed (I usually just smash it and plunk it in the stockpot, peels and all
  • 1-2 springs of fresh thyme or about 1/4-12 teaspoon dried
  • 3 fresh sage leaves (optional) but don't use dried sage since it will cloud your broth
  • 5-6 cups cool water or enough to just cover what's in the pot
  • 2 teaspoons Kosher salt
  • 12 peppercorns (optional
Wash each turkey neck under cool water and place in a stockpot large enough to handle all ingredients. Cut up (see above) turkey carcass.

Turkey necks make great stock because of all the tiny bones
and cartilage. When on sale, purchase to freeze.

Wash your carrots and celery, roughly chop, and add to stockpot along with onion (the peels will help turn the broth a rich golden color), garlic, and herbs. Fill with cool water just until the ingredients begin to float. (The less water, the stronger your stock. But be sure to at least cover the contents, especially if you give it an all-night simmer.) You may sub some of the water with canned chicken stock. If you have a "clear" leftover gravy, go ahead and add that. Sprinkle with salt.

Place over medium heat and bring just to a simmer. Do not boil. Boiling with cloud your turkey stock. Cover and simmer for 4-8 hours, (this is easiest on an electric stove top) checking and stirring occasionally. (I often put it on the stove just before I go to bed and then it's ready when I get up.)

Place a colander with a large bowl in your sink. Carefully dump the ingredients into the colander so the broth sieves into the bowl. Remove colander and place over the stockpot for about 10 minutes or so to catch any excess drippings. Return drippings to bowl. 


Rich, golden turkey stock flavored with fresh vegetables and herbs.


At this point, most of the nutritional value of your ingredients have leached into the stock itself. Just throw them out. Sometimes I'll pick some of the meat off for my cat. I just dump the colander ingredients into a plastic grocery bag (make sure it has no holes!) and place in the garbage. If you have pigs or goats, they love it. If you live near the edge if a wood, possums, raccoons etc. will gobble it up at night, including bones.

Wash out your stockpot. Place a sieve over it and now strain your stock from the bowl back into the stock pot to rid it of any smaller impurities.

Taste your stock and add more salt if necessary, a little at a time. Be careful to never over-salt your stock--it's easy to do. Place the raw rice in a sieve and wash under cold water. Why? You want to get rid of the starch that could cloud your soup.


To Make Soup

For the Soup:
  • 6 tablespoons washed, raw, long-grain white rice (not instant)
  • Noodles (see notes above)
  • 1/2 - 3/4 cup chopped carrots
  • 1/3 cup chopped celery
  • dried onion flakes (optional)
  • Salt to taste
  • Dried dill or parsely (optional)

Carrots and celery with rice make a simple and rich turkey soup.


Wash and cut your celery and carrots. Place in stockpot and bring to a simmer. I don't usually add onions. If the broth is a bit too watery, I will add some dried onions that easily dehydrate in the broth and add flavor. Sometimes a small garlic clove, sliced. Now add the rice. Cover and simmer until rice is fluffy, about 20-30 minutes. Remove from heat and sprinkle with a bit of dried parsley if desired. Allow to sit for another 20 minutes or so. The longer your soup sits, the fluffier the soup will become.

Ladle into bowls and, if desired, sprinkle with dried dill.

Delicious! (I've had this spoon since I was five years old!)


Notes:

After putting your stock through the sieve, you may cover it and place in the refrigerator if you don't want to assemble a finished soup that day. The fat will have risen to the top and solidified and is easily peeled away, if desired. OR instead of refrigerating your stock, place in freezer bags and freeze until ready to use.

If you use regular table salt, use half of the Kosher amount. But Kosher salt is milder in flavor and is recommended.

When making the stock, use up your largest carrots and the outer ribs of celery saving the more tender ones for the actual soup.


Friday, September 9, 2011

But I Can't Cook! Ten Easy KB recipes You Can Make!


There was a time when even the best of cooks and chefs couldn't cook. It's a skill that takes time and patience. And repetition. 

If you are one who thinks he/she can't cook, Yes you can. In fact, you can do an awesome job! A few pointers on getting started:


  • Start simple. Avoid complicated recipes with many ingredients.
  • Read over the entire recipe from start to finish, several times. If you don't understand something, look it up or ask someone who does.
  • Have all your ingredients on hand and already measured out.
  • Know what pots and pans you are going to use, including utensils. Things can burn and get out of control when you're pulling open drawers and opening cabinets trying to find things.
  • Have things like pot holders handy.
  • Keep a bit of warm, sudsy water in the sink for quick clean up of spills, etc.
  • Turn off your cell phone. Put on some nice music that won't distract you. Tell people to keep out of the kitchen--your kitchen. Remember the old adage: Too many cooks spoil the broth.
  • When using a burner, gas or electric, begin low. You can always dial up.
  • And never walk away from a simmering pan or pot. A neighbor recently put some bacon on the stove and then took a call on her cell phone as she walked to the deck outside. By the time the smoke alarm went off it was too late. The apartment had filled with smoke and she had a lot of cleaning to do. Moral of story: We also cook with our ears. Stay within earshot.
  • Don't change a recipe. I always advise to first make a recipe as is. You can change it the second time around.


Kitchen Bounty: Easy Rice with Spinach and Parmesan Cheese (Company Rice)
People will think you're a genius when you serve this savory dish.

Kitchen Bounty: Mashed Potatoes
Even people who cook well make crappy mashed potatoes. A bowl of warm, fluffy spuds can be a meal in itself.

Kitchen Bounty: Potato and Bacon Pie
This is pretty straight forward. It's a lot of cutting, but worth it.

Kitchen Bounty: Cube Steak Neapolitan
Bring this to the table and you'll get applause!

Kitchen Bounty: Ground-Beef Stroganoff
Serve this with mashed potatoes for a filling meal.

Kitchen Bounty: Pasta with Garlic, Olive Oil and Parmesan
It doesn't get much easier than this. Just be sure to have a huge bowl to do the mixing.

Kitchen Bounty: Rice and Chicken (Easy Risotto)
If you have a food processor, you're in business.

Kitchen Bounty: Veal Stew
Lovely and delicious.

Kitchen Bounty: Ham and Hominy Soup
If you can open cans, you can make this. People will want the recipe, so be ready!

Kitchen Bounty: Split Pea Soup with Bacon and Rosemary
Another great, easy soup!

Wednesday, August 31, 2011

Philly-Style Cube Steak

Sometimes, I surprise even myself! 


Cube steaks are economical and versatile. They don't carry much on the flavor side, so they lend themselves to creative interpretation. And ingredients. Most are made with a thick "gravy." No thanks. 

I look for medium-sized cube steaks. 

Here, they are the vehicle for a simple"Philly-style"ingredients of onions, peppers, mushrooms and cheese. I used a sharp Provolone. I have also used a mild Havarti jalapeno (Boar's Head brand). The surprise ingredient is the salami. Don't omit it. A few slices of paper-thin Genoa salami add a lot of flavor to otherwise insipid cube steak.


Have your deli cut the number of pieces of salami and cheese you will need. It's fresher and less expensive.

The first time I made this I only used enough veggies to cover each cube steak. On subsequent trials, I increased the amount to be able to serve some on the side which I now prefer. Feel free to add yellow, orange and/or red peppers. I usually pick up what's cheapest. If you like heat, add a jalapeno or similar hot and spicy pepper. I do not.

Serves 2
  • 2 cube steaks, medium in size, about 4 oz. each 
  • 1/2 large green pepper, thinly sliced*
  • 1/2 onion, sliced, and then each slice cut in half
  • 2-3 button mushrooms, sliced
  • 1 large garlic clove, minced or pressed
  • Dried thyme, a pinch or two
  • Red pepper flakes, a pinch or two (optional)
  • 4 slices paper-thin deli hard or Genoa salami (don't omit)
  • 4-6 slices Provolone cheese, cut in half
  • Flour
  • Seasoned Salt
  • Salt and Pepper
  • Butter
  • Smoked paprika or regular paprika (optional)

Season the cube steak with seasoned salt and pepper. Dredge in flour. Lay aside.


Sautee onion and pepper in a bit of olive oil and a tad of butter over medium-low heat. When they begin to get soft and turn a bit brown, add the mushrooms and 1/2 teaspoon salt. Sautee until mushrooms begin to get soft and release their juices. Add garlic and just stir until fragrant.  Stir. Remove pan from burner and place vegetable medley onto a plate.


Add a bit more olive oil to pan and when hot fry cube steak. (I was really bad and fried mine in some bacon grease I had saved in the fridge.) When juices appear on surface, flip. When juices appear on second side, it's done. It doesn't have to cook all the way through since it will bake in the oven for a bit.

Remove cube steak to shallow oven-safe dish or just keep in the pan you used. Cover with two slices of salami. Cover evenly with pepper/onion mixture. Place additional mixture around it. Bake at about 350-375 F degrees, uncovered, for about ten minutes.


Remove from oven and cover with cheese. If desired, sprinkle with paprika (I prefer the smoked paprika). Return to oven until cheese is melted, about a good five minutes. Allow to cool a bit and serve.

After ten minutes in the oven, note the browner, more caramelized onions.

I sprinkled the cheese on this one with a bit of smoked paprika before placing in the oven. 


Notes: One thing I learned from working in a deli with hardened New York Italians for customers: the only way to eat hard salami is if it's sliced paper thin. It really does make a difference. The slice is buttery and seemingly melts in your mouth. Thicker pieces can be chewy.