Monday, February 21, 2011

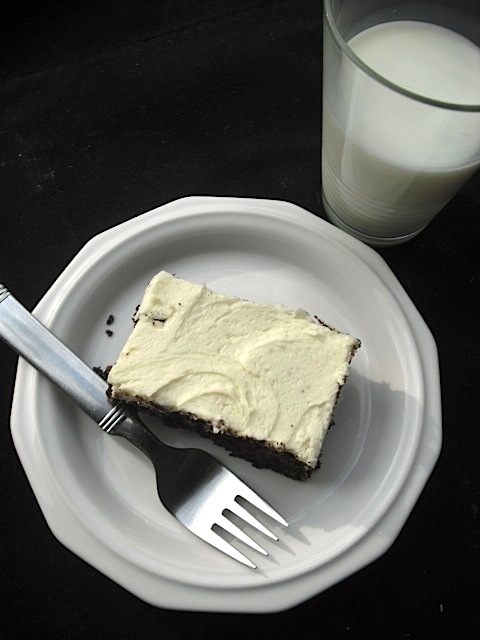
Sour Cream Chocolate Cake


Not your ordinary, everyday snacking cake, this
chocolate beauty is rich with butter and sour cream.


This is another in my quest for small cakes that bakes in an 8 x 8 x 2 pan.* It's a perfect dessert cake for guests or special occasions. The crumb is dense but light, moist and chocolaty and lends itself to decorating options, such as fresh berries in the summer. I settled for a simple, almond buttercream frosting. The addition of rum and vanilla flavoring to the thick batter gives just a hint of "richness" that complements the chocolate.

  • 3/4 cup butter, room temperature (1 1/2 sticks) not margarine
  • 3/4 cup unsweetened cocoa powder
  • 3/4 cup all-purpose flour
  • 1/2 teaspoon baking powder
  • 1/4 teaspoon salt
  • 1 cup sugar
  • 3 large eggs, washed
  • 1/2 teaspoon rum-flavored extract
  • 1/4 teaspoon vanilla
  • 1/4 teaspoon almond extract
  • 1/2 cup sour cream

Preheat oven to 350 F. and butter/grease your pan. Cut a piece of wax paper to fit in the bottom and then grease it. Dust with cocoa powder tapping out the excess.

Stir together the dry ingredients of cocoa, flour, baking soda and salt.

I used a combination of regular, unflavored cocoa
and Dutch-processed cocoa.

Beat the butter and the sugar until fluffy. Add eggs one at a time beating well after each addition and scraping down the sides of the bowl. Add flavorings.

I now wash all my eggs before cracking them open.
Remember folks, they're pushed out of a chicken's butt!
If you wash an apple, why not an egg? Think about it.

Add flour alternately with the sour cream, beginning and ending with the flour. Be sure to scrape down the sides of the bowl.


I think maybe that "J" swirl was from my finger
scooping up the rich batter...

Spread batter into prepared pan. Tap on counter to dislodge any air bubbles. Bake for 30-35 minutes, checking on it after 25 minutes and until a cake tester or toothpick comes out clean. Cool for 10 minutes. Invert on wire rack. Cool and frost as desired.


Almond Butter-Cream Frosting
  • 1/4 cup margarine, a bit cool
  • 1 1/2 cups powdered sugar
  • 1/4 teaspoon vanilla
  • 1/8 teaspoon almond extract 
  • 1-2 tablespoons milk


Cream margarine until light. Begin adding powdered sugar a little at a time, beating after each addition. If it's not "creamy" but remains "powdered" don't be alarmed. Add the vanilla and almond extracts. Beat in. Now add the milk, first just one tablespoon. Beat. Add another teaspoon. Beat. If it needs to be fluffier, add a bit of another teaspoon until desired consistency is reached. Taste. Add more flavoring if desired.

Skim a thin layer on cakes and sides, not worrying about crumbs. Then add remaining frosting. If desired, top with fresh berries or a decoration of slivered almonds.

*Notes: I baked this in a 9 x 9 pan since my 8 x 8 was being used for another purpose. The cake was done after about 25 minutes. May also be baked in a round 8" cake pan.

For a less-rich, but equally great cake, try my chocolate mayonnaise cake with almond cream cheese frosting. Just click on the link below:
Kitchen Bounty: My Favorite Chocolate Cake



Thursday, February 17, 2011

Small Baked Ham with Brown Sugar Glaze and Bacon


With rising food and meat prices, I'm trying to find ways to stretch my dollar. Leftovers is one of the easiest solutions ... and nothing keeps giving like a ham. But it needn't be that half-a-hog affair for the holidays that weighs as much as a toddler.

Boneless (even bone-in) hams provide a lot of food for a great price. Having said that, avoid propaganda pre-sliced, pre-voted, hunks of meat. You are quite the cook and you can determine the centimeter slice of of your meat and your vote!

A ham like this cooks fast. It provides a ton of taste and, even more importantly, can be used for sandwiches and cut and diced to be used in casseroles later on. And that's exactly what I plan to do with it. It will feed me for quite a while.

In case you didn't know it, I worked in a deli and am "certified" in all things "Boar's Head." To make this ham, I used a Boar's Head product that I highly recommend: Brown Sugar Glaze. It has a great "spice" flavor that balances the sweet brown sugar. The ham was a whole, non sliced, "sweet ham"

A little goes a long way. This will easily do 2 small hams.
 I look for it on sale.

Follow the instructions on the back of the jar. I prefer to stud a ham with cloves after scoring it. You want to score it so the glaze seeps down into it. If there is a layer of fat on the ham, this is especially necessary. Unfortunately, with small hams such as this, there is not. They tend to be very lean.

I've had this can of whole cloves since the 1980's.
I got it at my little corner store in Indiana
where prices were written, not stamped.
I'm not a believer in changing your spices
every year. Sheesh...who came up with that idea?
Oh, the $pice companies . . .
Score the ham diagonally using a sharp knife.
Stud with whole cloves. These are spaced
about two inches apart (they don't have to go into the cuts.)
Because smaller hams can be very lean, I cover it with bacon which is optional. Then put in about 3/4 cup HOT water into the pan and tent with foil and crimp the edges tight. Why? Well, the ham is already cooked. You just want to warm it up and let the flavors seep into it without drying it out. The water and foil will kind of steam it. (The directions only call for 1/2 cup of water, but I like the extra "sauce.")

After scoring and studding, slather with the glaze.

This is probably a bit of overkill with bacon--
I could have used less. It won't crisp during cooking,
it will just release needed juices into the ham
and drip into the water making a wonderful sauce.
(This is my black deli apron.)

Bake at 350 degrees about 15 minutes per pound. The last fifteen minutes, remove the foil. Baste the ham with pan juices and pat on a bit more glaze over the bacon if desired.

When done, remove and discard bacon. Cut ham into thin, thin slices removing cloves as you go. Place them back into the pan drippings. To make sauce, place pan over low flame and heat up. Add a pinch or two of Cayenne pepper. Strain and serve on the side.

Here's what to make with leftover ham:


Monday, February 14, 2011

Black Eyed Peas with Ham Shanks and Greens (Hoppin' John)


Black eyed peas are a Southern tradition. The custom is to serve them with collard greens and some type of pork on New Year's Day for good luck and prosperity. No two recipes are the same. Some use kale. I used spinach simply because I had it on hand. If using collards, the correct way is to de-stem them, stack them, roll them like a cigar, and slice into ribbons. Some people do thinly slice the stems. I discard them.

Some use smoked sausages, but most rely on ham hocks or shanks and most is served over white rice although some add the rice directly to the dish as it cooks. If you like bean soup, you will like black-eyed peas. This dish is so prevalent in the South  that this time of year one can buy pre-soaked black-eyed peas in the produce department of most grocery stores. A real convenience.

More and more people use smoked turkey parts for their beans. I stick with the ham. No need to raise the ire of Mr. Good Luck . . . Sadly, today, even in the South, pork hocks and shanks are difficult to find. I've been told China buys most. In fact, China now owns Smithfield Ham . . . Here in the South, we have easy access to smoked pork jowl--basically, it is a fatty, uncut, smoked thick slab of bacon. Many people cut it into chunks to use for Hoppin' John. I love it. In fact, many people just use bacon ... and lots of it.

Some people add the rice to the Hoppin' John stew; others serve the stew over the rice. Many do not use tomatoes, but I like what it brings to the party and, historically, it is accurate.

Soak your peas in water overnight, changing the water
a few times. I put them in a colander and place
that in a bowl. Just lift, rinse, and then replace the water.


There are a zillion stories about Hoppin' John along with ingredients and recipes. All are fun to read. This is just how I usually make mine (If you had a ham for Christmas, now is the time to use that ham bone!) By all means, do some Google searches and watch a few videos. Most are entertaining and informative.

Happy New Year! May your year be filled with bounty, success, and health!

Hoppin John
  • 1 1/2 - 2 lbs. smoked ham shanks
  • 1 tablespoon oil
  • 4 cups chicken stock or a combination of water and chicken stock
  • I often add a bit of "Better Than Bouillon" ham flavored enhancer
  • 1 1/2 cups dry black eyed peas
  • 1 10-oz. box frozen spinach, thawed and squeezed dry or
  • 2-3 cups cut/torn fresh collards leaves, no stems
  • 1 cup chopped onion
  • 1/2 cup chopped celery
  • 1/2 cup chopped green pepper
  • 1 jalapeno pepper, seeded and chopped or
  • 1/4 teaspoon red pepper flakes (or to taste)
  • 1 heaping tablespoon minced garlic
  • 1 can stewed tomatoes, broken apart
  • 1/2 - 1 teaspoon cumin seed, freshly crushed
  • 3/4 teaspoon smoked paprika
  • Salt and pepper to taste
  • Chopped green onions
  • 1 1/2 cups raw white rice
  • 3 cups water
  • 1 teaspoon dried onion
Rinse and pat dry the ham shanks. Heat oil in a large Dutch oven and brown the ham shanks on all sides. When done, remove to plate.

Ham shanks have more meat than a ham hock, but both
are inexpensive and filled with flavor.


Browning the shanks intensifies the flavor
and releases the fat in which to
saute the vegetables.

Add a bit more oil to the pot and add the chopped onion, celery, green pepper, jalapeno and cook until soft, scraping up the brown bits left over from the ham in the pan. Salt and pepper to taste.


Add the cumin, the chopped garlic and the red pepper flakes and stir just until fragrant. Add the black-eye peas then the tomatoes, juice and all. Add the chicken stock, the ham shanks and any liquid that has collected on the plate. Bring to a slow boil, lower heat and simmer, partially covered, for about 1 1/2 hours until beans are soft and tender.


Remove shanks from pot and allow to cool. Add the smoked paprika. Taste. If you'd like it hotter, add a few shakes of Tabasco. Re-season with salt, pepper, cumin if needed.


Pour 3 cups water into a pan and add 1 teaspoon salt and 1 teaspoon dried onion. Add the 1 1/2 cups raw rice. Stir. Bring to a boil then lower to simmer and cover until done. Set aside. 

Remove the meat from the bones and cut up.

Save the bones. Using a small spoon or knife, remove the marrow
and feed to your cat or dog--they love it.


Add meat back to the beans in the pot. Now add the chopped greens and stir. The mixture will be like a thick soup. 


To serve: place rice on plate, spoon over the Hoppin John and sprinkle with the green onion. If desired, you can also sprinkle with crumbled bacon. It is traditional to serve with cornbread!!!


Notes: Cumin has a distinct flavor. If you are not used to it, add less rather than more. You can always re-season it. Hoppin' John is great served with any type of smoked sausage.


Friday, February 11, 2011

Chicken with Rice and Bacon (Funeral Chicken)


(Update: Since I posted this recipe, I've seen several on the Internet. It belongs to a family of old-time recipes called "Funeral Chicken." All add some kind of canned, cream soup, rice, and bacon. Why "funeral?" Well, it takes a long time to bake, time one can spend with the bereaved family, etc. The older recipes always use bone-in, skin-on chicken, hence the long bake time. The newer recipes use skinless, boneless chicken breast which I DO NOT recommend at all (unless you want it to be your own funeral ....) 

This recipe is really all about the rice. It's incredible. After two hours of a slow bake, it's infused with the most amazing, delicious, tantalizing, smoky, bacon-chicken taste I've ever had. And it's a cinch to prepare! I have tried short cuts. They don't work. 

This is very-much adapted from the cookbook, Sweet Potato Queen's Big-Ass Cookbook (and Financial Planner). It's a fun read and recipes aren't "listed" but kind of imbedded in the prose. Thank-you for the inspiration ... 

It's important to cover this dish securely so the steam cooks the rice and chicken. Do not peek! Do not change that oven dial! Once that oven door closes, leave it that way until the buzzer goes off.

I secure the dish with two pieces of regular foil and then place a glass lid on top. (You can use one sheet of heavy-duty foil.) Use an 11 x 7 Pyrex baking dish. Mine has a glass lid which I love. Crimp the foil as tightly as possible around the rim of the dish. Yes, I have OCD ....

Do not use boneless, skinless chicken. As a society, we are obsessed with cuts of meat that bear no resemblance to it's origin. I find it both odd and peculiar. And, as a cook, it makes me angry. Bone, skin and sinew add flavor and moisture. Do you have teeth? 'Nough said ....

I used no salt in this recipe since the bacon and soup have plenty. It's important to season the chicken liberally. I used a combo of Bell's Poultry Spice, pepper, garlic powder, and a bit of whole, dried thyme. I coat the front and back of the chicken. I also like Cavender's All Purpose Greek Seasoning. The original recipe called for just Italian seasonings. Blah ... That is where it went wrong.

  • 4 meaty chicken thighs, bone-in, skin-on*
  • 4 pieces of bacon, cut in half, plus one extra piece cut into fourths
  • 1 cup raw rice (not instant and not brown) I use Uncle Ben's Converted Rice
  • 1 can cream-of-chicken soup
  • 1 cup water
  • 1 teaspoon dried onion
  • 1/2 - 1 teaspoon seasoning (see above) per chicken thigh
  • 2 tablespoons dried parsley
  • Several grates of fresh nutmeg--don't omit
  • A pinch or two of garlic powder
  • Cayenne pepper--to season

Preheat oven to 300 F degrees.  Layer the bacon on the bottom of the dish. Evenly distribute the raw rice over it and sprinkle with the dried onion (how easy is that?)

My 11 x 7-inch Pyrex pan easily accommodates a slice
of bacon that has been cut in half.**


Place 1/4 piece of the extra bacon piece under the skin of each thigh. This gives it just a bit more taste and keeps it from drying out. Evenly coat the chicken pieces with the spices you are using, including the dried thyme and several grinds of pepper, front and back. Place on top of the rice. Give just a dash of Cayenne pepper on top.


In a small bowl or pitcher, measure one cup water and add the cream of chicken soup. Add the parsley, nutmeg, garlic powder. Whisk until well blended. Pour into the casserole, right over the chicken. (If you used garlic powder on the chicken, omit it in this step.)


Now cover tightly, tightly with heavy-duty foil or two layers of regular foil. Place in a 300 F oven for two hours. Do not peek. Remove from oven and allow to sit for 20-30 minutes covered. Do not open!!! You want the steam to finish cooking the rice.


The rice will have expanded from absorbing the liquids and juices from the chicken. It will be infused with an incredible smoky flavor from the bacon. 

Be careful not to overcrowd the pan.

I once brought to this work for my companions and the deli dept. cooked it in their oven. It was incredible. Why? Double the meat meant double the drippings as they leached into the rice.

If you double this recipe, be sure NOT to crowd the pan. You may need to adjust your cooking time a bit longer, especially if you are using all thighs. A trick is to use a sharp paring knife and just cut along the thigh bone, enough to release it from the meat.
 
*Chicken thighs are meaty and gelatinous, so they add a lot to this dish and I can't imagine it without them.

**Don't use "thick" bacon. The last time I made this the bacon was ridiculously paper-thin (have you seen the price of bacon, lately?), so I used a bit extra.

Notes: The original recipe called for just seasoning the chicken with salt, pepper, paprika and then using one teaspoon of dried oregano mixed with the soup mix and spices listed. The paprika really didn't add anything to the dish. I opted to liberally season the chicken instead and to insert a small piece of bacon under the skin. The soup mixture picked up the flavors just fine. After preparing this several times, I think liberally seasoning the chicken is important otherwise the chicken itself is a bit bland. And it's really important to SEAL this puppy TIGHT to keep in the steam to cook the chicken otherwise you will end up with raw rice.

This comes out to about one piece of bacon per thigh. That's not a lot of bacon.